There is a specific kind of magic that happens when a classic childhood snack meets a gourmet bakery staple. These Oreo stuffed chocolate chip cookies aren’t just a dessert; they are a 3-inch thick architectural marvel of the baking world.
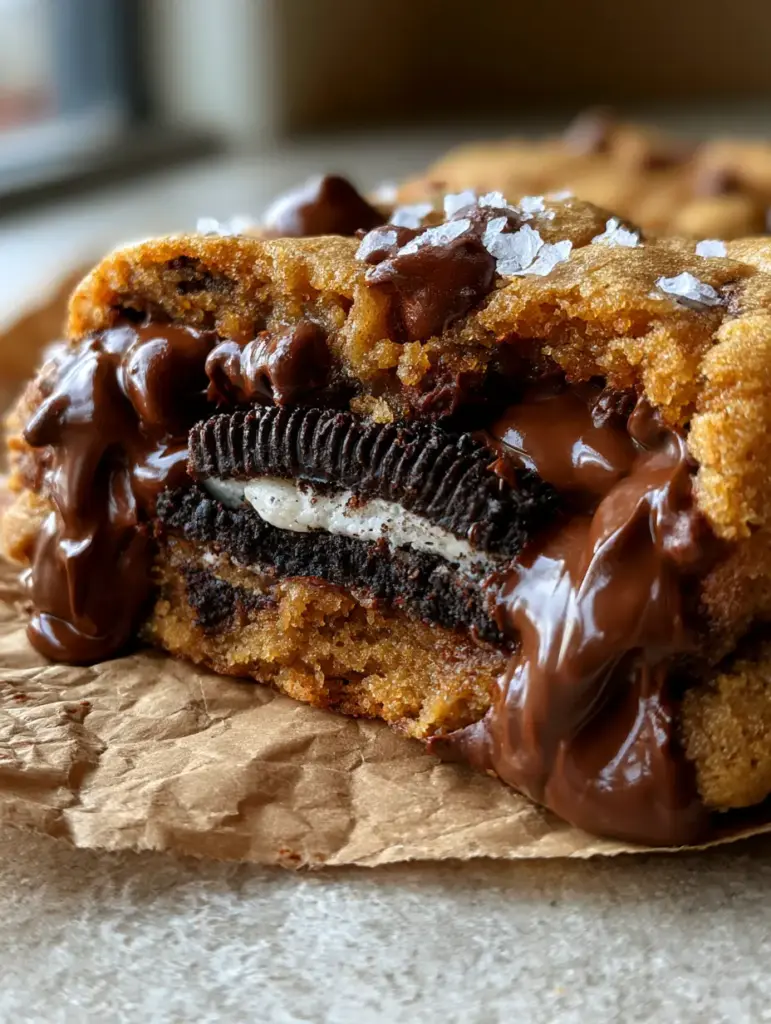
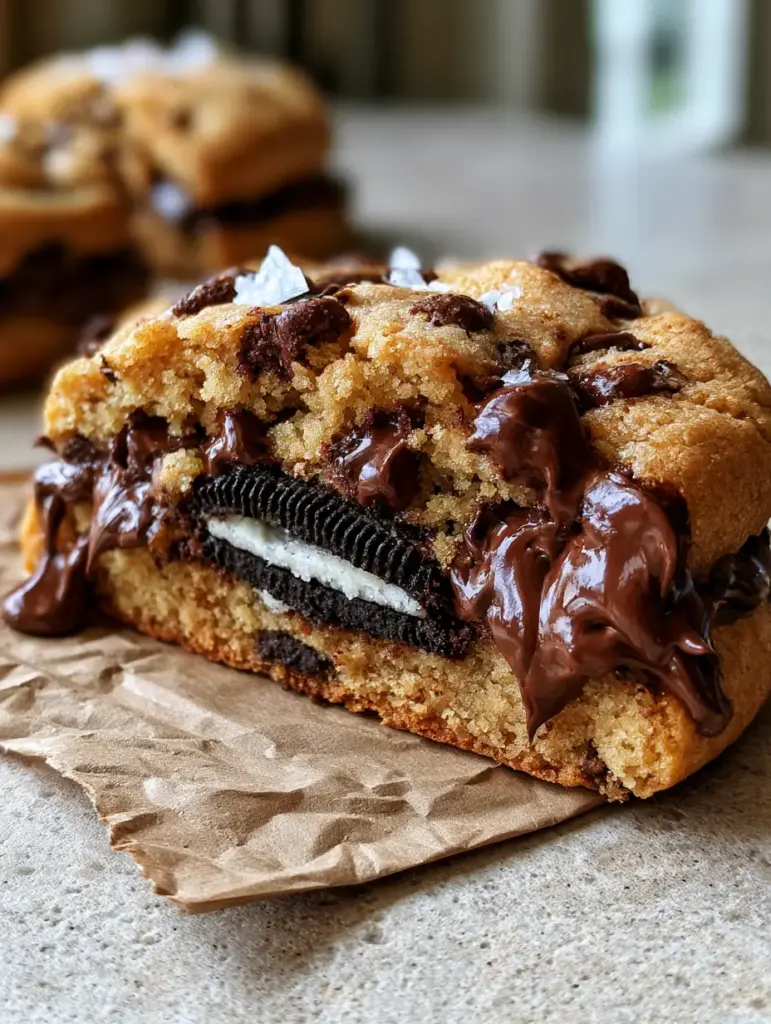
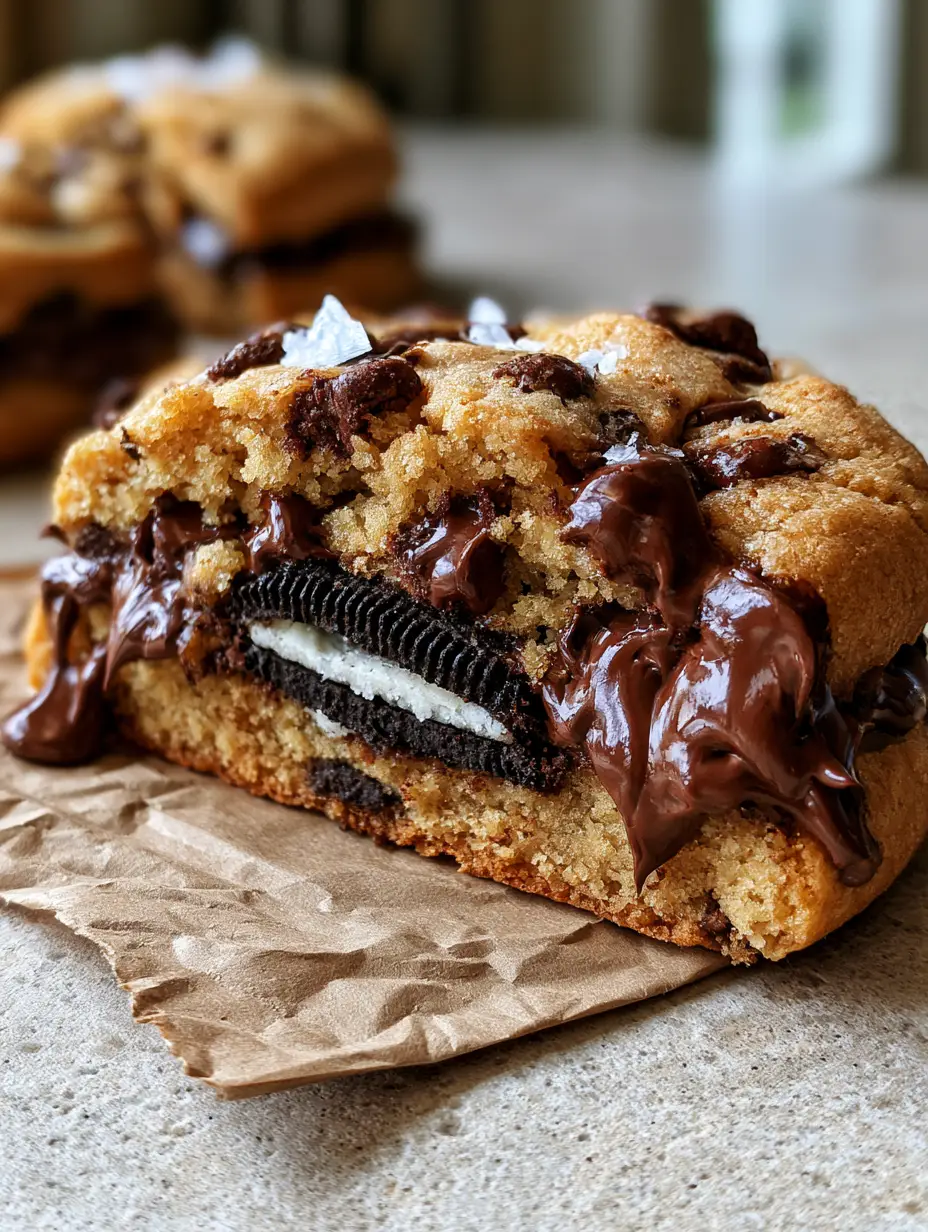
Imagine breaking open a warm, golden-brown buttery shell to find a perfectly intact Oreo sandwich cookie nestled inside a soft-baked gooey interior. The contrast between the dark chocolate biscuit, the white cream layer, and the oozing puddles of semi-sweet chocolate is a visual and sensory masterpiece.
This recipe was designed to replicate that viral handheld smartphone photo look. We are talking about massive cookies resting on crumpled parchment paper, glistening with flakes of Maldon sea salt under soft afternoon sunlight.
Why This Stuffed Cookie Recipe Outshines Every Other Bakery Treat
- The Massive 3-Inch Profile: By using specific chilling techniques and a higher flour-to-fat ratio, we achieve a thick, gourmet height that looks like it came from a high-end New York City bakery.
- The “Invisibly” Perfect Oreo Center: We use a unique wrapping technique to ensure the Oreo stays centered and intact, providing that iconic black-and-white cross-section.
- Glistening Chocolate Puddles: Unlike standard chips, we use hand-chopped semi-sweet chocolate chunks that create those Instagram-worthy molten pools on the golden crust.
- The Sweet and Salty Balance: A final garnish of flaky sea salt cuts through the richness of the buttery dough and the sweet Oreo cream.
The Science Behind the Ingredients for Your Stuffed Masterpiece
Creating Oreo stuffed chocolate chip cookies requires more than just mixing dough; it requires an understanding of how fat and sugar interact under heat. Every ingredient here serves a specific structural or aesthetic purpose.
1 cup (227g) Unsalted Butter, Cold but Cubed: Using cold butter instead of room temperature prevents the cookies from spreading too thin. This is the secret to maintaining that 3-inch thick bakery profile.
1 cup (200g) Light Brown Sugar, Packed: The high molasses content in brown sugar is what provides the soft-baked gooey interior and the deep, caramel-like flavor profile. It also keeps the dough moist for days.
½ cup (100g) Granulated White Sugar: While brown sugar provides chew, white sugar helps the edges achieve that signature golden-brown buttery cookie dough crispness. It aids in the Maillard reaction during baking.
2 Large Eggs, Cold: Eggs provide the protein structure needed to hold the massive weight of a whole Oreo cookie. Using them cold helps keep the overall dough temperature down before the chilling phase.
3 cups (375g) All-Purpose Flour: This is a sturdy amount of flour designed to create a thick “shell.” If you enjoy this texture, you might also love our stuffed chocolate cookies.
1 tsp (5g) Baking Soda and ½ tsp (3g) Sea Salt: Baking soda provides the lift and browning, while the salt balances the sugars. We also add 1 tbsp of cornstarch to ensure the crumb remains ultra-tender.
1 ½ cups (255g) Semi-Sweet Chocolate Chunks: We prefer chunks over chips because they melt into larger, irregular puddles. This mimics the visual cues of a high-end food blogger’s photo.
12-14 Whole Oreo Cookies: These are the star of the show. Keeping them whole is essential for that striking visual contrast revealed when the cookie is broken in half.
Maldon Flaky Sea Salt: This is the final touch for visual texture and a pop of flavor. It highlights the crumb texture and makes the chocolate “pop” against the golden dough.
Essential Equipment for Gourmet Cookie Results
To achieve the look of a professional food blog photo, you need a few specific tools. These ensure consistency and the perfect “crumpled parchment” aesthetic.
You will need a large baking sheet and high-quality brown parchment paper. The parchment prevents sticking and provides that rustic, textured background for your final photos.
A large cookie scoop (about 3 tablespoons in volume) is helpful, but since these are massive, you will likely be weighing your dough balls. A kitchen scale ensures every cookie is exactly the same size for even baking.
Finally, a cooling rack is essential to prevent the bottoms from becoming soggy. If you enjoy deep-dish textures, check out our deep dish filled cookies.
Step-by-Step Instructions: Mastering the Oreo Stuffing Technique
Phase 1: Preparing the High-Fat Cookie Base
In a large stand mixer fitted with the paddle attachment, cream the cold, cubed butter with the brown and white sugars on medium-high. You are looking for a light, fluffy texture that takes about 3 to 4 minutes to achieve.
Add the eggs one at a time, followed by a tablespoon of high-quality vanilla extract. Scrape down the sides of the bowl to ensure every bit of butter is incorporated into the emulsion.
Slowly add the dry ingredients: flour, cornstarch, baking soda, and salt. Mix on the lowest speed just until no streaks of white flour remain; overmixing will lead to a tough cookie rather than a soft-baked gooey interior.
Phase 2: Folding in the Molten Chocolate Puddles
Using a sturdy spatula, fold in the semi-sweet chocolate chunks by hand. Ensure the chunks are distributed evenly so every bite of the Oreo stuffed chocolate chip cookies has a hit of melted chocolate.
Once mixed, the dough should be thick and slightly heavy. This density is what allows it to support the Oreo center without collapsing in the oven.
Phase 3: The Art of the Oreo Stuffing
To assemble, scoop approximately 2 tablespoons of dough and flatten it into a disc in your palm. Place a whole Oreo cookie in the center of the disc.
Take another 1-2 tablespoons of dough and place it on top of the Oreo. Pinch the edges of the top and bottom dough pieces together, sealing the Oreo completely inside.
Roll the massive ball between your palms until it is a smooth sphere about the size of a lemon. This ensures the Oreo is perfectly intact and centered for the final “broken in half” reveal.
Phase 4: The Crucial Chilling Step
Place the dough balls on a tray and refrigerate for at least 60 minutes. This is non-negotiable for achieving a 3-inch thick cookie.
Chilling the dough solidifies the butter, which means it will melt much slower in the oven. This prevents the cookies from spreading into flat puddles and keeps the Oreo hidden until the first bite.
Expert Tips for Bakery-Style Success
- The “Scoot” Technique: If your cookies come out slightly irregular, place a large circular glass or cookie cutter over them immediately after they exit the oven. Move the glass in a circular motion to “scoot” the edges into a perfect circle.
- Cold Butter is Key: Unlike many recipes that call for room temperature butter, these Oreo stuffed chocolate chip cookies rely on cold fat for their vertical height.
- Don’t Overbake: The cookies are done when the edges are a rich golden-brown but the centers still look slightly underbaked and soft. They will firm up on the hot baking sheet.
- Chunk Placement: For the best visual result, press a few extra chocolate chunks onto the top of the dough balls before baking. This ensures the “puddles” are visible on the surface.
Storage, Reheating, and Freezing Advice
These cookies are best enjoyed warm when the chocolate is still glistening and oozing. However, they store beautifully in an airtight container at room temperature for up to 4 days.
To regain that fresh-from-the-oven gooey texture, microwave a single cookie for 10-15 seconds. This softens the Oreo cream and melts the chocolate chunks perfectly.
You can also freeze the unbaked dough balls. When a craving hits, bake them directly from the freezer, adding 2-3 minutes to the total baking time. For more dough-based treats, see our cookie dough hearts.
What to Serve with These Massive Stuffed Cookies
An indulgent treat like this deserves a great beverage pairing. A cold glass of whole milk is the classic choice, but you could also serve these alongside a spread of other treats.
If you are hosting a dessert party, try pairing these with rich brookie cookies or even cookie dough twists for a variety of textures.
For a fruitier contrast, a side of fresh strawberries or strawberry shortcake cookies can provide a bright acidity that balances the heavy chocolate.
Frequently Asked Questions
Absolutely. Freeze the assembled dough balls on a tray, then transfer to a bag. Bake from frozen at 375°F, adding about 2-3 minutes to the baking time.
Yes! Double Stuf Oreos work perfectly and provide an even more pronounced white cream layer in the center. Just ensure you seal the dough carefully around the extra thickness.
No, for this specific 3-inch thick gourmet look, we want to avoid flattening. The cold dough and high flour content will maintain the height naturally.
Use hand-chopped semi-sweet chocolate bars rather than standard chips. Chips are designed to hold their shape, while chopped chunks melt into irregular, glistening puddles.
This usually happens if the butter is too warm or the dough wasn’t chilled long enough. Ensure you use cold, cubed butter and chill the stuffed dough balls for at least 60 minutes before baking.
The Ultimate Oreo Stuffed Chocolate Chip Cookies Recipe
Oreo Stuffed Chocolate Chip Cookies: The Ultimate Gooey Stuffed Cookie Recipe
Ingredients
Equipment
Method
- Cream the cold butter and both sugars in a stand mixer until light and fluffy, about 3-4 minutes.
- Add eggs one at a time and vanilla, mixing well and scraping the bowl.
- Slowly incorporate flour, cornstarch, baking soda, and salt on low speed until just combined.
- Fold in the chocolate chunks by hand until evenly distributed.
- Flatten 2 tbsp of dough, place an Oreo in the center, cover with 2 more tbsp of dough, and seal edges tightly into a lemon-sized ball.
- Refrigerate dough balls for at least 60 minutes to prevent spreading and maintain thickness.
- Bake at 375°F (190°C) for 10-12 minutes until edges are golden-brown and puddles of chocolate are glistening.
- Sprinkle with Maldon flaky sea salt immediately and cool on the sheet for 10 minutes.
Notes
Press extra chocolate chunks onto the top of the balls before baking for maximum visual impact.
Closing & Call to Action
Mastering the Oreo stuffed chocolate chip cookies is a rite of passage for any serious home baker. They offer the perfect blend of nostalgic flavors and gourmet execution, making them a guaranteed hit at any gathering.
We would love to see your “broken in half” photos! If you made these, please leave a comment below and tell us how they turned out. Don’t forget to share your results and tag us on Pinterest for a chance to be featured!